
능글맞은 구렁이
Spring-인텔리제이 프로젝트생성 본문
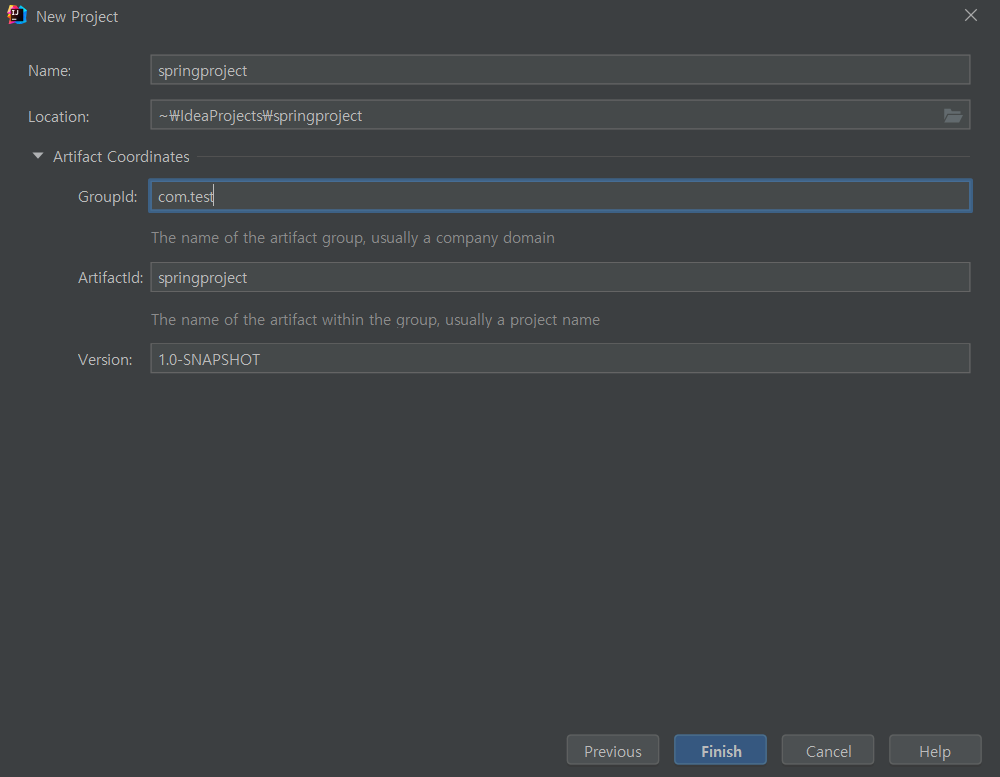
1. New Project에서 Maven을 선택 (아무것도 누르지말고 Next 클릭) >
프로젝트 명, 그리고 GroupId를 본인이 하고싶은 단어로 수정하고 Finish

2. 만들어진 프로젝트에서 프로젝트명 우클릭
> Add Framework Support 선택 >Spring MVC를 찾아 선택 > OK


3. 프로젝트에 lib가 생성되어있음을 확인할수있다. 이 lib는 삭제하도록한다.

4. lib를 삭제하고 Project Structure 클릭 > Libraries > 두개의 파일 삭제 > ok


5. pom.xml수정!
<?xml version="1.0" encoding="UTF-8"?>
<project xmlns="http://maven.apache.org/POM/4.0.0"
         xmlns:xsi="http://www.w3.org/2001/XMLSchema-instance"
         xsi:schemaLocation="http://maven.apache.org/POM/4.0.0 http://maven.apache.org/xsd/maven-4.0.0.xsd">
    <modelVersion>4.0.0</modelVersion>

    <groupId>com.test</groupId>
    <artifactId>springproject</artifactId>
    <version>1.0-SNAPSHOT</version>

    <properties>
        <maven.compiler.source>8</maven.compiler.source>
        <maven.compiler.target>8</maven.compiler.target>
        <org.springframework-version>5.2.3.RELEASE</org.springframework-version>
    </properties>

    <dependencies>
        <dependency>
            <groupId>org.springframework</groupId>
            <artifactId>spring-webmvc</artifactId>
            <version>${org.springframework-version}</version>
        </dependency>
        <dependency>
            <groupId>javax.servlet</groupId>
            <artifactId>javax.servlet-api</artifactId>
            <version>4.0.1</version>
        </dependency>
    </dependencies>

</project>
▼아래의 부분만을 추가한 것이다.
 	<properties>
        <org.springframework-version>5.2.3.RELEASE</org.springframework-version>
    </properties>

    <dependencies>
        <dependency>
            <groupId>org.springframework</groupId>
            <artifactId>spring-webmvc</artifactId>
            <version>${org.springframework-version}</version>
        </dependency>
        <dependency>
            <groupId>javax.servlet</groupId>
            <artifactId>javax.servlet-api</artifactId>
            <version>4.0.1</version>
        </dependency>
    </dependencies>
수정을 하고나면 이러한 아이콘이 생길 것이다. 그럼 Load Maven Changes 버튼을 클릭해준다.
(※참고※ pom.xml을 수정하게 되면 반드시 업데이트를 시켜줘야한다.)

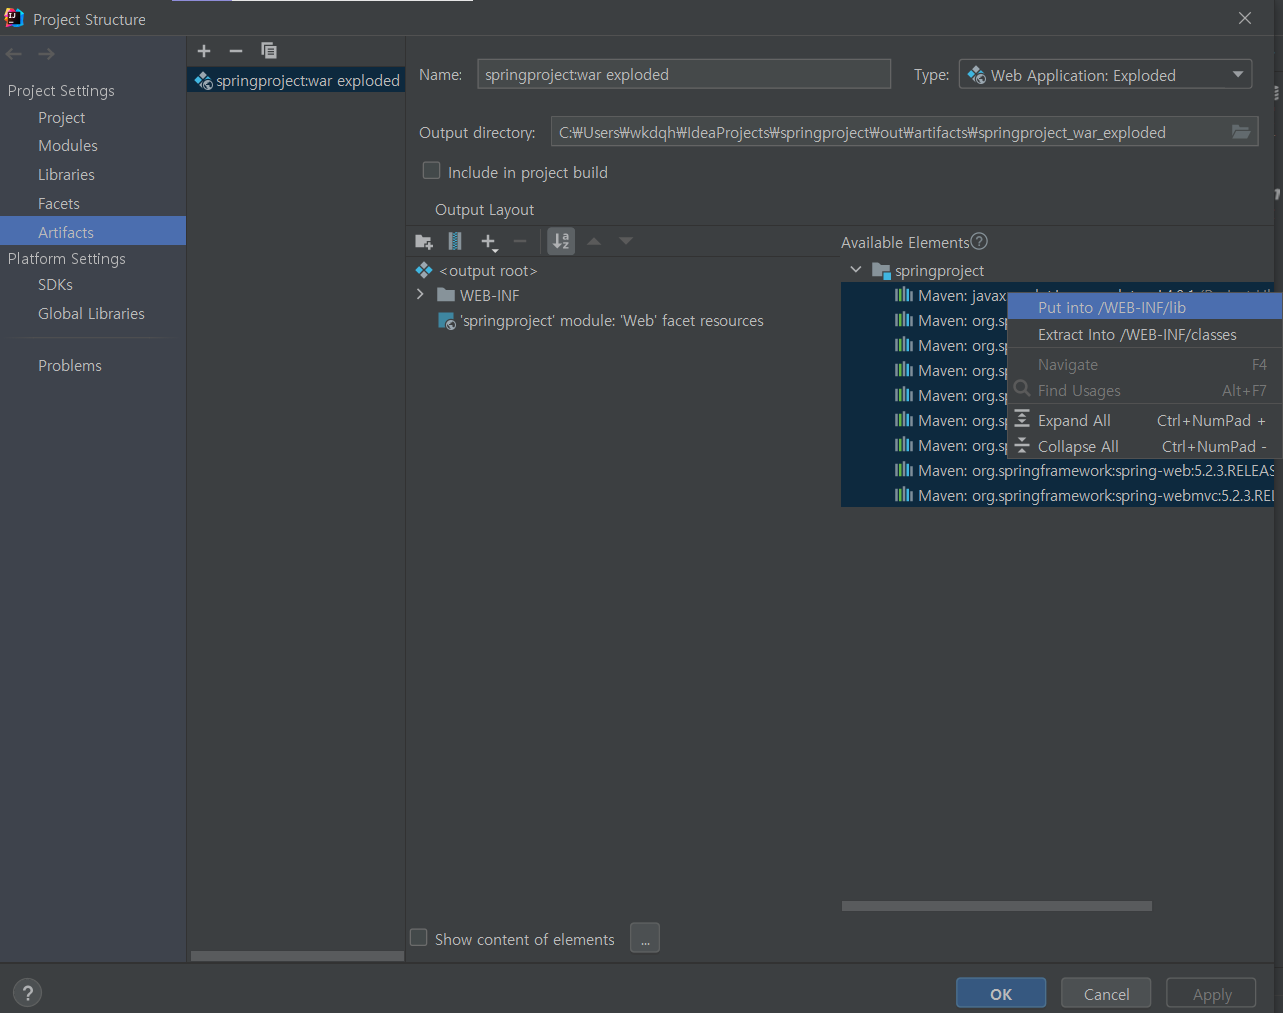
6. pom.xml수정도 완료되었으면 다시 Project Structure(Ctrl + Shift +Alt + S) >
Artifats > Available Elements에 있는 모든 파일 선택 우클릭 > put into > ok

7. 어느 정도 설정이 끝나서 Controller를 만들어서 프로젝트를 실행시켜보겠다.
src > main > java > 패키지생성 > 컨트롤러파일생성(java파일)

8. web 폴더를 shift + F6을 눌러 webapp로 이름을 수정해준 뒤 src > main으로 이동시켜준다.

9. web.xml를 수정해준다.
<?xml version="1.0" encoding="UTF-8"?>
<web-app xmlns="http://xmlns.jcp.org/xml/ns/javaee"
         xmlns:xsi="http://www.w3.org/2001/XMLSchema-instance"
         xsi:schemaLocation="http://xmlns.jcp.org/xml/ns/javaee http://xmlns.jcp.org/xml/ns/javaee/web-app_4_0.xsd"
         version="4.0">
    <context-param>
        <param-name>contextConfigLocation</param-name>
        <param-value>/WEB-INF/applicationContext.xml</param-value>
    </context-param>
    <listener>
        <listener-class>org.springframework.web.context.ContextLoaderListener</listener-class>
    </listener>
    <servlet>
        <servlet-name>dispatcher</servlet-name>
        <servlet-class>org.springframework.web.servlet.DispatcherServlet</servlet-class>
        <load-on-startup>1</load-on-startup>
    </servlet>
    <servlet-mapping>
        <servlet-name>dispatcher</servlet-name>
        <url-pattern>/</url-pattern>
    </servlet-mapping>
</web-app>
▼아래의 부분만 수정한 것이다.
  <servlet-mapping>
        <servlet-name>dispatcher</servlet-name>
        <url-pattern>/</url-pattern>
    </servlet-mapping>
10. dispatcher-servlet.xml수정!
<?xml version="1.0" encoding="UTF-8"?>
<beans xmlns="http://www.springframework.org/schema/beans"
       xmlns:xsi="http://www.w3.org/2001/XMLSchema-instance"
       xmlns:mvc="http://www.springframework.org/schema/mvc"
       xmlns:context="http://www.springframework.org/schema/context"
       xsi:schemaLocation="http://www.springframework.org/schema/beans http://www.springframework.org/schema/beans/spring-beans.xsd http://www.springframework.org/schema/mvc https://www.springframework.org/schema/mvc/spring-mvc.xsd http://www.springframework.org/schema/context https://www.springframework.org/schema/context/spring-context.xsd">

    <mvc:annotation-driven />
    <context:component-scan base-package="com.test.controller" />

    <bean class="org.springframework.web.servlet.view.InternalResourceViewResolver">
        <property name="prefix" value="/WEB-INF/views/" />
        <property name="suffix" value=".jsp" />
    </bean>
</beans>
▼이부분은 그대로 작성하면 안되고 본인의 Controller가 있는 패키기명을 작성해주어야한다.
<context:component-scan base-package="Controller가 있는 패키지" />
11. Web파일의 위치를 바꾸어주었기 때문에 Project Structure(Ctrl + Shift +Alt + S) 이동
> modules > Web Resource Directory 경로수정

12. 마지막으로 톰캣 설정 > Add Configuration 클릭>+ 클릭 > TomcatServer의 Local클릭


13 . Application server에서 본인의 컴퓨터 경로를 따라 톰캣파일을 선택해준다.
아래 부분의 Fix 경고아이콘을 클릭
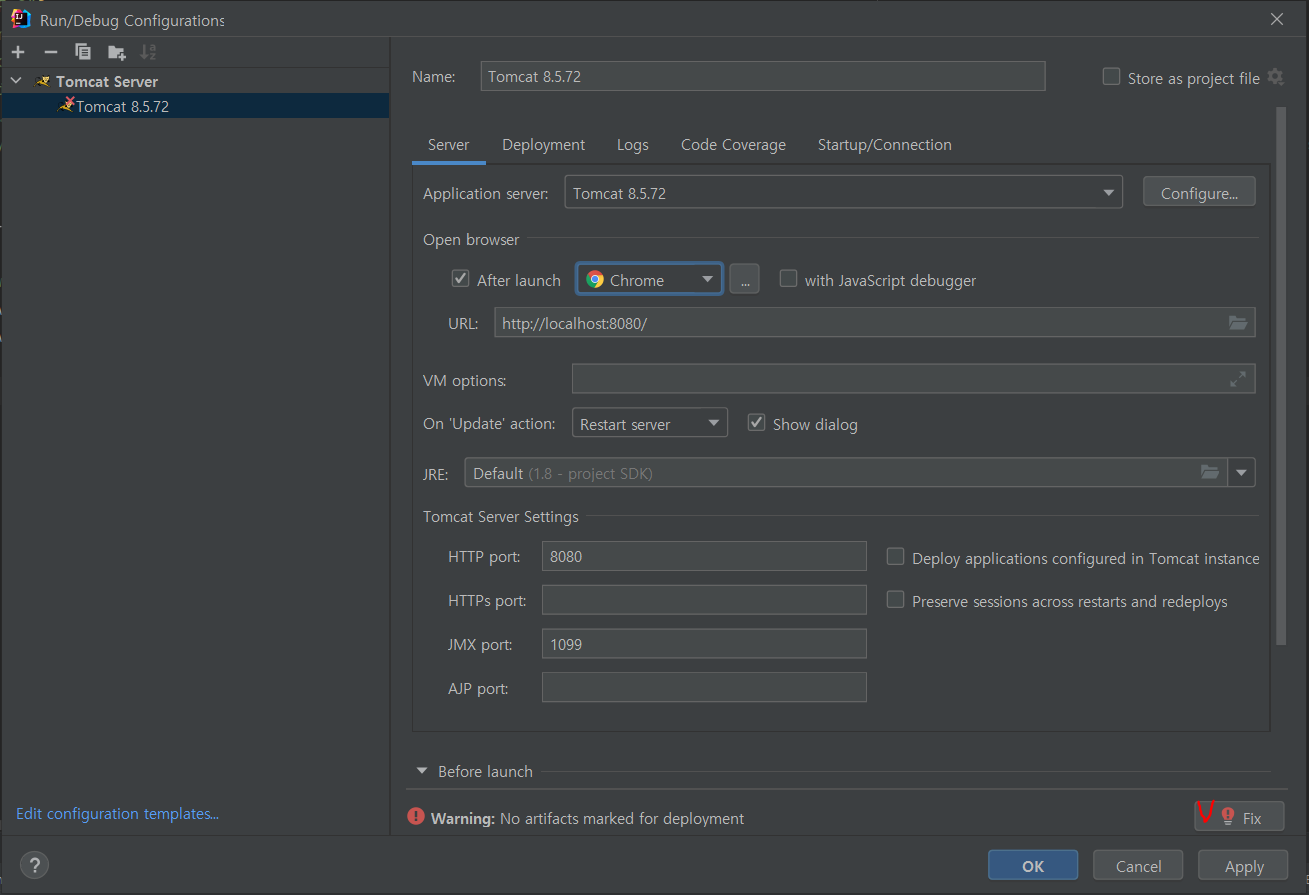

14. Application context 경로를 / 로 수정 > ok


15. 그리고 프로젝트를 실행하면된다.

16. 만약에 404에러가 날경우 프로젝트명.iml 이란 파일을 찾아 아래와 같은 코드가 있는 경우,
이부분을 지우면 정상적으로 실행될 것이다.
<component name="NewModuleRootManager" inherit-compiler-output="true">
    <exclude-output />
    <content url="file://$MODULE_DIR$" />
    <orderEntry type="inheritedJdk" />
    <orderEntry type="sourceFolder" forTests="false" />
  </component>
'Framework > Spring' 카테고리의 다른 글
| Spring-사용방법, 프로젝트 생성시 주의 (0) | 2021.06.15 |
|---|---|
| Spring-컨테이너종류, XML설정 (0) | 2021.06.14 |
| Spring-프로젝트 구조 분석 (0) | 2021.06.13 |
| Spring-개발을 위한 준비/javaConfiguration(설정2) (0) | 2021.06.12 |
| Spring-개발을 위한 준비 (설정1) (0) | 2021.06.12 |

